Updated:
18 January 2015
 Adobe Illustrator, being developed primarily for use in design
and print applications, can produce files which are
problematic when it comes to creating the strictly
flat, 2D files that are required for laser cutting and
engraving. With this in mind, we have produced the
following guide to assist customers who are using
Illustrator to create their artwork.
One of the biggest problems with Illustrator, when producing files, for laser work, comes from using layers,
clipping masks and shapes to cover up areas that are not to be shown or processed.
This will create multiple, underlying, ‘invisble’ lines which the laser can see and will
process in some way, thus causing output errors on the final work.
Using Illustrator for creating vector files for laser work is fine if used correctly, bearing
mind the end use of the file and that laser cutting and
engraving is a flat 2D process.
ANYTHING 3D or 3D-ish
WILL NOT WORK.
The principles contained in this guide will also
be useful to those
creating files from CAD software, such as AutoCad and
when using other graphics software.
Keep all curves and lines as simple as possible.
Do not use masks, groups or compound curves.
If you have groups
then ungroup them and remove any compound curves
to leave just 2D curves and lines. Remove all masks
and associated hidden detail.
Flatten the image to a single layer so that
EVERYTHING in the
file is on the same layer.
You can still differentiate between lines
that are to be cut, just lightly scored or areas
that are to be engraved by making the lines a
different colour but they must still be kept on the
single layer.
As with all files, areas that are to be
engraved MUST be
bounded by fully closed paths -
No Gaps or Broken Lines
of Any Kind.
How To Construct Shapes For Laser Cutting or
Engraving
Adobe Illustrator, being developed primarily for use in design
and print applications, can produce files which are
problematic when it comes to creating the strictly
flat, 2D files that are required for laser cutting and
engraving. With this in mind, we have produced the
following guide to assist customers who are using
Illustrator to create their artwork.
One of the biggest problems with Illustrator, when producing files, for laser work, comes from using layers,
clipping masks and shapes to cover up areas that are not to be shown or processed.
This will create multiple, underlying, ‘invisble’ lines which the laser can see and will
process in some way, thus causing output errors on the final work.
Using Illustrator for creating vector files for laser work is fine if used correctly, bearing
mind the end use of the file and that laser cutting and
engraving is a flat 2D process.
ANYTHING 3D or 3D-ish
WILL NOT WORK.
The principles contained in this guide will also
be useful to those
creating files from CAD software, such as AutoCad and
when using other graphics software.
Keep all curves and lines as simple as possible.
Do not use masks, groups or compound curves.
If you have groups
then ungroup them and remove any compound curves
to leave just 2D curves and lines. Remove all masks
and associated hidden detail.
Flatten the image to a single layer so that
EVERYTHING in the
file is on the same layer.
You can still differentiate between lines
that are to be cut, just lightly scored or areas
that are to be engraved by making the lines a
different colour but they must still be kept on the
single layer.
As with all files, areas that are to be
engraved MUST be
bounded by fully closed paths -
No Gaps or Broken Lines
of Any Kind.
How To Construct Shapes For Laser Cutting or
Engraving
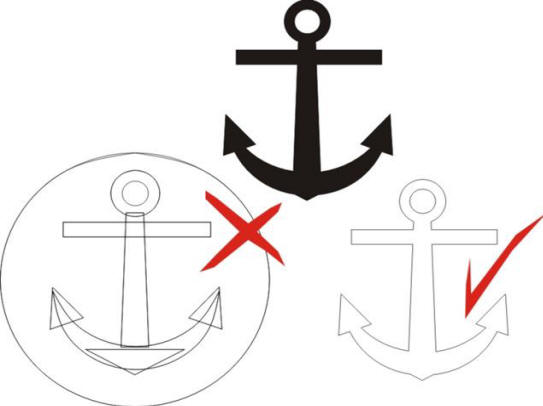 The image to the right, top centre, shows a black
filled anchor which is to be laser cut or engraved.
If the image was to be printed, all would be fine
but....
When we look at the construction
of the shape, lower
left, it shows that the designer has built up the
shape using individual sub-shapes which are
overlaying each other. The bounding circle also has
mulitple splines which will cause problems.
When constructed in this way, the laser will
see every line and will cut every line. If the image
is to be engraved the laser will engrave all the
indivindual shapes on top of each other. So, which
ever way you look at it, the results of using the
bottom left anchor will be a mess and not at all
what was invisaged.
The image, lower right, is correctly drawn
with a fully closed path and can be successfully
laser cut or engraved.
Delete any guidelines as they will also
cause random lines and marks in the laser file.
When saving your files, make sure you:-
Uncheck the box for embedding colour
Uncheck the compression box
Check the pdf compatibility box
If you are using a new version of
Illustrator, save using backwards compatibility to
CS4 or 5.
To be on the safe side, export your files in
EPS format and send us those as well.
These notes have been prepared to assist you to
produce a clean file that can be sent to the laser
with the very minimum of preparatory work, making
the process as efficient and cost effective as
possible. Any in-depth work that we have to do on
your files will have to be charged.
If you are still unsure of your files
compatibility,
Please call. We are always willing to
assist wherever we can.
The image to the right, top centre, shows a black
filled anchor which is to be laser cut or engraved.
If the image was to be printed, all would be fine
but....
When we look at the construction
of the shape, lower
left, it shows that the designer has built up the
shape using individual sub-shapes which are
overlaying each other. The bounding circle also has
mulitple splines which will cause problems.
When constructed in this way, the laser will
see every line and will cut every line. If the image
is to be engraved the laser will engrave all the
indivindual shapes on top of each other. So, which
ever way you look at it, the results of using the
bottom left anchor will be a mess and not at all
what was invisaged.
The image, lower right, is correctly drawn
with a fully closed path and can be successfully
laser cut or engraved.
Delete any guidelines as they will also
cause random lines and marks in the laser file.
When saving your files, make sure you:-
Uncheck the box for embedding colour
Uncheck the compression box
Check the pdf compatibility box
If you are using a new version of
Illustrator, save using backwards compatibility to
CS4 or 5.
To be on the safe side, export your files in
EPS format and send us those as well.
These notes have been prepared to assist you to
produce a clean file that can be sent to the laser
with the very minimum of preparatory work, making
the process as efficient and cost effective as
possible. Any in-depth work that we have to do on
your files will have to be charged.
If you are still unsure of your files
compatibility,
Please call. We are always willing to
assist wherever we can.
LASER CUTTING and ADOBE ILLUSTRATOR
Preparing Vector Laser Cutting/Engraving Files With Adobe Illustrator
Adobe Illustrator, being developed primarily for use in design
and print applications, can produce files which are
problematic when it comes to creating the strictly
flat, 2D files that are required for laser cutting and
engraving. With this in mind, we have produced the
following guide to assist customers who are using
Illustrator to create their artwork.
One of the biggest problems with Illustrator, when producing files, for laser work, comes from using layers,
clipping masks and shapes to cover up areas that are not to be shown or processed.
This will create multiple, underlying, ‘invisble’ lines which the laser can see and will
process in some way, thus causing output errors on the final work.
Using Illustrator for creating vector files for laser work is fine if used correctly, bearing
mind the end use of the file and that laser cutting and
engraving is a flat 2D process.
ANYTHING 3D or 3D-ish
WILL NOT WORK.
The principles contained in this guide will also
be useful to those
creating files from CAD software, such as AutoCad and
when using other graphics software.
Keep all curves and lines as simple as possible.
Do not use masks, groups or compound curves.
If you have groups
then ungroup them and remove any compound curves
to leave just 2D curves and lines. Remove all masks
and associated hidden detail.
Flatten the image to a single layer so that
EVERYTHING in the
file is on the same layer.
You can still differentiate between lines
that are to be cut, just lightly scored or areas
that are to be engraved by making the lines a
different colour but they must still be kept on the
single layer.
As with all files, areas that are to be
engraved MUST be
bounded by fully closed paths -
No Gaps or Broken Lines
of Any Kind.
How To Construct Shapes For Laser Cutting or
Engraving
The image to the right, top centre, shows a black
filled anchor which is to be laser cut or engraved.
If the image was to be printed, all would be fine
but....
When we look at the construction
of the shape, lower
left, it shows that the designer has built up the
shape using individual sub-shapes which are
overlaying each other. The bounding circle also has
mulitple splines which will cause problems.
When constructed in this way, the laser will
see every line and will cut every line. If the image
is to be engraved the laser will engrave all the
indivindual shapes on top of each other. So, which
ever way you look at it, the results of using the
bottom left anchor will be a mess and not at all
what was invisaged.
The image, lower right, is correctly drawn
with a fully closed path and can be successfully
laser cut or engraved.
Delete any guidelines as they will also
cause random lines and marks in the laser file.
When saving your files, make sure you:-
Uncheck the box for embedding colour
Uncheck the compression box
Check the pdf compatibility box
If you are using a new version of
Illustrator, save using backwards compatibility to
CS4 or 5.
To be on the safe side, export your files in
EPS format and send us those as well.
These notes have been prepared to assist you to
produce a clean file that can be sent to the laser
with the very minimum of preparatory work, making
the process as efficient and cost effective as
possible. Any in-depth work that we have to do on
your files will have to be charged.
If you are still unsure of your files
compatibility,
Please call. We are always willing to
assist wherever we can.


